Showing posts with label paper. Show all posts

24 September 2013

thing-a-week 37 and 38: Vedic square experiments

For weeks 37 and 38, I experimented with the Vedic square.

I've always admired the geometric designs in Islamic art and architecture but figured that the math involved would be too complicated to learn. But, another recent Good Job Brain episode unlocked at least one secret for me by telling me about the Vedic square.

You can go ahead and read the brief Wikipedia article article about it, but the Vedic square is a 9x9 table that shows digital roots — the remainder of ((x * y) / 9) — instead of multiplication products:

Thanks, Wikipedia.

If you draw lines connecting all the same digital roots in the square, you can already make some pretty neat shapes.

But you can also make simple, elegant designs if you take a whole row from the square, use the numbers in that row as measurements, and keep turning your paper at a certain angle until you get back to where you started.

Of course, those instructions might be difficult to understand without an example, but I'll get to those in a bit; please bear with my nerding out a little longer.

I tried to go all pen-and-paper for this, but it turns out that my protractor is inexact, so I put these black-and-white drawings together on a computer. Even then, I had trouble getting everything to line up just right, so I really have to hand it to the first artists who worked with these measurements by hand.

Whatever angle you choose, it looks like you'll get yourself nine possible shapes. I first went with all 90-degree angles, and all but one row led me to produce these swastika-like shapes. This is the one with sequence 1 (1, 2, 3, … , 9):


Sequence 5 (5, 1, 6, 2, 7, 3, 8, 4, 9):


Sequence 7 (7, 5, 3, 1, 8, 6, 4, 2, 9):


Sequences 2, 4, and 8 produced the same patterns, but in the reverse direction. Sequences 3 and 6, I felt, were too simple — four connected or overlapping rectangles in the same turning shape. The one row that didn't produce such a shape was row 9, which gave only a square.

At this point, I could appreciate for myself how the numbers of the Vedic square could be kind of cosmic, or why people might see them as holy, magical, or divine. The sequences are so simple, but if you follow them with one unbroken line, you create a shape that turns forever, and you always end up back where you began.

If you think this says something about the nature of life and the universe, then you'll probably find this either depressing or comforting.

I did two more designs by turning at a 45-degree angle. Here's sequence 2:


and sequence 5:


Of course, these things just beg to be colored, so I also printed out this last one and used it as a template for this:


To my frustration, of course, doing this with paper wasn't as neat as it was on the computer. But, I like it enough to want to make more. And I still have other angles to try.

06 September 2013

thing-a-week 33-36: a month of kirigami drills

I've been itching to make more kirigami models but haven't had any good ideas lately, so I decided to do some exercises with stairs. I still haven't come up with any new ideas for models after this, but I can say I've gotten faster at drafting models to cut. The exercises have also helped me see potential technical missteps I might make if and when I do have something new to work on.

And, of course, kirigami is always therapeutic.

33: I came up with this after staring at some Masahiro Chatani models on the Internet. It was supposed to be more complex, but I was off at the start by a few centimeters, and that affected how much room I had for more layers.

In general, I work in centimeters and half-centimeters; any smaller can get hard to fold.


34: This one was more messing around than an exercise, but the nesting arch trick here helped me figure something out for a card/letter I made for my brother later that week. (I guess I did have a new idea. But since it's personal, I'm not going to post photos of it here.)


35: This was another exercise I set for myself after looking at Masahiro Chatani models.

Folding adjacent stairs like these needs some care; you can see diagonal bumps where the staircase in front pulled on the one in the back.


36: I saw some photos of Chand Baori, which appeared in that really gorgeous Tarsem Singh movie, The Fall, as well as in The Dark Knight Rises. Yes, yes, more stairs.

The difficulty I had with this model was measuring the base. I wanted stairs all the way to the base, but again, I had some measurement problems. You can also see some wrong creases at the base due to those problems.

While it looks nice, I'm not fond of horizontal models that go so far out from the spine; if the paper is soft or becomes soft (e.g. from moisture or from someone sitting on it by accident), it starts to collapse in on itself.

12 August 2013

thing-a-week 28, 29, 30, 31, 32: Excuses and My Lumpy Heart

I'm truly sorry that I haven't been able to keep up this series in the past month or so.

I could blame this on several things. It took me a couple of weeks, for instance, to find and then move my things into a new apartment. That was last month, though, and my things still aren't unpacked. I'm not actually living in the place yet because the bolts that hold my bed together got lost in the last move, so I'm still going through hardware stores and looking for right-sized replacements. And in the meantime, I'm still lodging with friends, making a longer commute, and being tired.

I wrote in June that I liked the extra time that my new work hours gave me, but these days, I spend more of that extra time just spacing out, emptying my head from the night before and recovering just enough for the one ahead.

And while I tell myself that I should be glad for the rest, I also know that making things helps me to rest, and I just haven't made enough time to make things.

For week 28, I made two flexagons with abstract designs. I actually worked on them at the office while waiting for each day's editorial meeting, cutting and folding and drawing a little each day.

Unfortunately, they just disappeared from my desk one morning or evening. Either I actually slipped them into a book or notebook to work on elsewhere and then simply lost them, or someone found them interesting and took them, like they took two of my modular hassocks.

As for week 29, sorry to subject you to more of my abysmal drawing skills, but all I have to show for that week is this drawing of a land hermit crab.


Sometimes, Cris and I listen to trivia podcast Good Job Brain in the car together, and one episode explained how land hermit crabs swap shells. We happened to be surrounded by SUVs then, so I started to imagine a not-so-distant future where land hermit crabs are hulking monsters. They use hollowed out cars as shells and trade up as they grow, from VW beetles to hummers and even buses and container vans. For entertainment, people go to arenas to watch the crabs fight for bigger shells.

For this drawing, I used a photo of a crab as a reference but was too lazy to put more work into the SUV. Perhaps once I have a story fleshed out, I can ask a more talented friend to illustrate.

Week 30 was the worst. I was supposed to complete my Processing project that week but ended up resigning the whole course. While I liked my project idea, the course itself no longer held my interest; its objectives were more and more clearly different from my own. So, I decided to just remember the sunk cost fallacy, quit the course, recover from my burnout, and save my project for another day.

All I have to offer for week 30, then, is a screenshot of some of the code I worked on while I was still working on it.


I don't know if you'd count the code, so I don't know if you'd count what I made in week 31, either.

I recently joined a Facebook group of fellow former Glitch players. I thought my stay wouldn't be long, but it turns out that there are many other people who also still feel sad that Glitch is gone, however silly it might seem to have so much feeling for a closed computer game. There's just nothing like it out there.

One day, a game developer invited the group to test a new game, Manyland. While the game wasn't going to be anything like Glitch, the developers had heard about the culture of Glitch players and were hoping we could bring some of that to the game.

So, week 31 saw me testing Manyland when I could. I can best describe it as a two-dimensional LEGO, though Minecraft players say it's like Minecraft. It is lots of fun but kind of lonely; perhaps due to lack of other players and a map, it gets existential fast — where am I? Why am I here? Where does this world end? If I build a platform far enough, will I go all the way around to where I began?

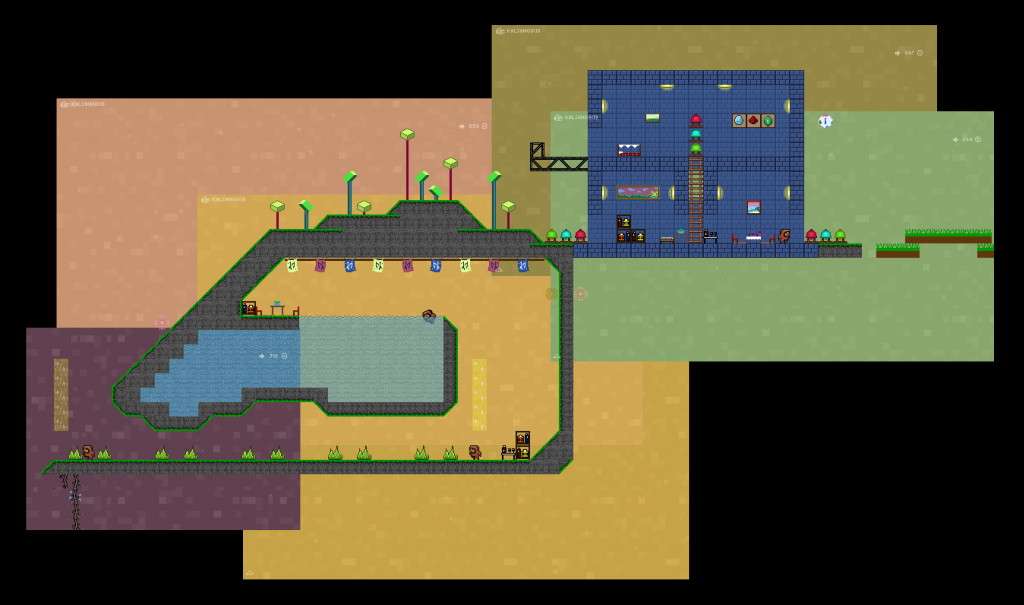
One of the first things I built was this simple brick box house with an underground swimming cavern and tiny wine cellar:


You can actually change the color of the sky, and the colors blend as you move across the screen, but when you take screenshots, you get just the color of the sky (and any translucent things, like water) based on your current position. The little gnome-like person in this assembled screenshots is actually me.

If you prefer something more traditional than code or digital building, then week 31 was also when I started work on the craft for week 32:


Week 32 was a nice return to paper. One of the secretaries at work used to spend her free time on complex, three-dimensional paper models of video game and cartoon characters. I wanted to try one of those but didn't want just any model. When I saw the Paper Torso by Horst Kiechle, it felt best for me.

I printed out the template of a human heart; the pieces took up about eight-and-a-half sheets of letter-size paper, and I did the cutting and folding in my spare time. I then glued all the pieces together in about three hours yesterday.

Photos of the resulting heart are below. It is pretty lumpy for several reasons: I cut next to some of the lines and not on them, and not all of my cuts were straight, so some of the triangles did not fit each other the way they were supposed to. I also used regular bond paper, which absorbed moisture from all the rain we've had lately and thus made the whole thing softer and easier to dent. While assembling the valves, I found I'd inverted a section and so had to push and pull it without tearing the whole thing apart.

But, it's mine, and I am happy to have made it, lumps and all.

Please excuse the awkward hand poses. I needed to keep a hold on the heart, but not too tightly, or I would have crushed it.


This project was lots of fun but also kind of weird. I knew what it was supposed to look like, and I knew that it was taking shape, but only when I had the whole thing in my hands did I think, This is a heart. I stood with it in front of a mirror just to see how big it was, and I somehow felt very small, cradling a white paper heart in my palms against my pink shirt.

I am thinking of doing lungs next, even if I don't even know what to do with the heart now.

The heart template is just one in a set of templates to build a neutered human torso. There are more templates on Mr. Kiechle's Paper Torso website; feel free to share with students, crafty doctors, and anybody else who might like the idea of making human organs out of paper.

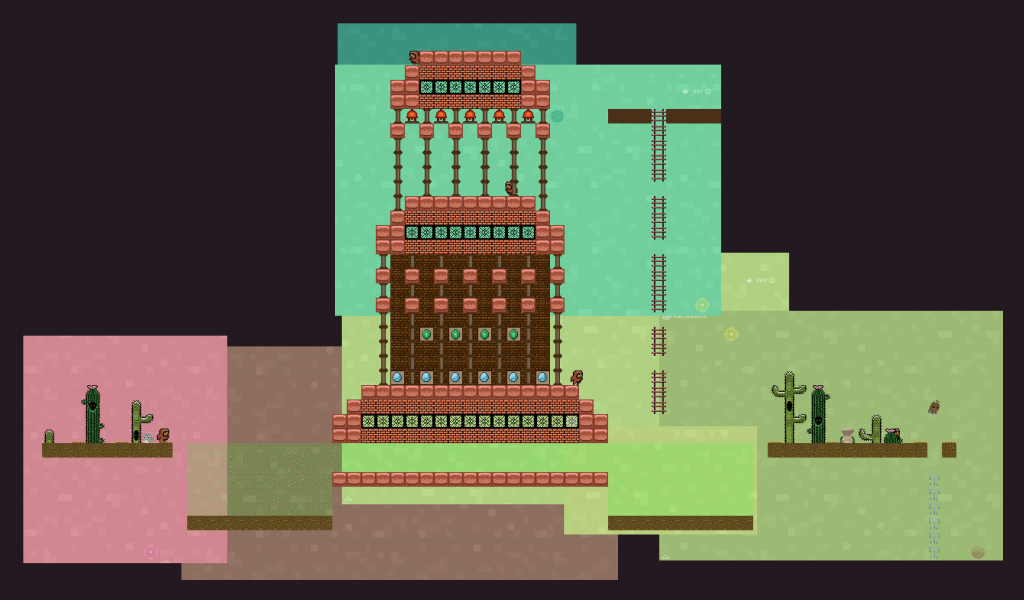
Other stuff I feel like sharing: this waterfall cabin I built in Manyland, accessible only by falling into the water and swimming down (water is weird in Manyland) and exit-able only by magic wind. Unless you cheat and build ladders or platforms, any other way brings death.


I also built this temple, but in hindsight, the color of the bricks I used makes the whole thing look like something else; something less, uh, temple-y.

The magic wind from the cabin will actually bring you here; you pop out of the gap on the right, next to the cacti.


I don't actually get to play Manyland that often; I only play it at home, and it depends on how I'm feeling. But it is lots of fun, and as the game is still in its early stages, the developers are quite reachable for help, feedback, and bug reports. If any of you get to play, my username is kalsangikid.

23 June 2013

thing-a-week 23, 24, 25

For week 23, I made this simple kirigami model on a sheet of parchment paper about half the size of a sheet of bond paper. I wanted to set it against black paper, but unfortunately, my stuff is still in storage. A problem with my new apartment means I can't actually move into it anymore and will have to find a new place again.

Anyway, I wanted to do something more about interiors than exteriors, and while I don't know if it's clear from this picture, I wanted to do something that wasn't all right angles.


Week 24 was my first week at my new job, so I managed only to start folding units for another icosadodecahedron:


This time, half were some old editor cards, and half were some old writer cards.

I assembled it the next day, but since you already know what it would look like, I didn't take a picture of the complete model.

For week 25, I drew this background for my Processing project. This is a photo instead of a scan as, like my black paper, my scanner is in storage. :|


I'm a little over halfway done with this thing-a-week series, and I think this is the first time I've put up a more detailed drawing than a rough kirigami diagram. This is far from original, though, as it's largely based on a photograph by Cory Richards of the Tsarang temples in Nepal.

A little after my last post about my troubles coming up with an original story concept for my Processing project, I actually hit on something, so I guess we'll see how it turns out.

29 May 2013

thing-a-week 20, 21, 22: macrame, sketches, Liana's birthday card + bonus origami vandalism

Week 20 saw me really busy, packing and moving out of my apartment. I had to stow my craft supplies for a while, but I managed to hang on to this bit of blue cloth, which I used to make another macrame bracelet.


It looks like any other rag, but it happens to be symbolic to me. The original length of cloth was used to tie up the new mattress I got from an outlet store, just a few weeks after I first moved into the apartment and maybe a month or so into my relationship with Cris. I remember feeling pretty grateful that day, that I could afford a little lifestyle upgrade and that I had someone like Cris to help me, even if he didn't have to. Physically and symbolically, the mattress was a nice step up from the old, sunken one I'd borrowed from my grandmother when I'd first moved into an apartment, now five years ago.

I also used a bit of the cloth in designing the cover of a journal that I completed in the apartment. Consider the fact that I hung on to the cloth for so long as proof of how big a hoarder I am sentimental I can be. (I still have a little more!)

Week 21 was difficult; the apartment I'm moving into next isn't actually finished yet, so I'm staying with friends for now. I made these sketches of kirigami models to illustrate verses from "The Black Riders and Other Lines," by Stephen Crane. But, the longer commute to and from my friends' place means less time to draft, cut, and fold models these days, so the sketches had to do for last week. I also couldn't find my craft knife; I should have set it aside during the move.


Today is my officemate Liana's birthday, so I made her this card. Liana loves dogs, and her family lost their beloved yellow labrador, Charlie, sometime ago. It looks like a lhasa apso puppy will be joining them this year, though.


To make up for the weeks I posted sketches, I learned a new modular origami unit that uses business cards instead of square papers.


I also learned that people in the origami community (!) can be pretty protective of models they claim to have discovered first, and because I learned the folds from Malachi Brown's website, I might be considered an origami vandal. (If you like, you can click on that link, and we can be vandals together.)

In grade school, I first learned origami from older kids who had books and who most definitely did not write to the authors of those books to ask permission to teach other kids how to fold the different models. All this time, I've experienced origami as a fun kind of geometry — everyone can learn geometry; there's no law against teaching each other math that happens to make flapping birds and inflatable paper balloons that inevitably get soaked with saliva at the blowhole.

I can understand how you might want something you've discovered all on your own to stay your own, but I don't see Pythagoras's estate chasing down everyone who wants to calculate the distance between two points, or Einstein's lawyers filing claims against every last t-shirt with E = m * c ** 2 on it.

But, okay, for the sake of attribution, an origami person (folder? craftsperson? artisan? artist?) named Valerie Vann claims to have discovered the base unit for the models I'm showing here. I did this for fun, not for profit.

Here are three hassocks, so called because they're cushion-shaped, and an icosadodecahedron. Oddly enough, I couldn't figure out how to make the pentagon hassock until I'd figured out the icosadodecahedron. There is also an octahedron in the back that uses a unit by Jennifer Campbell, but based on Mr. Brown's website, she doesn't seem as possessive of her discovery.


Perhaps this is a waste of business cards, but you'll have to take it up with the people who make them in such big batches. I didn't give out half of these before they became outdated.

11 May 2013

thing-a-week 17, 18, and 19

Things have been really busy in the past couple of weeks, but I've done my best to keep up with the crafts.

When I started making kirigami, I went through an inverted symmetry phase, and I wanted to revisit it for Week 17. Unfortunately, work piled up that week, so all I have to show for it is this nearly done diagram. I had a bit of a problem with the middle chunk, so I decided to start over.


Week 18 was not much better, but I lucked out when Taiwan put on a big tourism exhibit in the new Glorietta activity center, where they gave free supplies for these cows and messages in bottles. Mine is the blue cow; Mikko's is the gray.


They came courtesy of Flying Cow Ranch, the "Most Childish Ranch in Western Taiwan." The brochure offers other wonderful Engrish gems; this is what's on the cover:

Flying Cow Ranch is natural and fun,
Because the ranch is built by our bared hands and feet.
In Flying Cow Ranch,
You can jump like a child,
You can laugh like a child,
You can drink some milk with children.
The ranch is filled with the rich smell of dairy products.
Come to visit the most childish ranch in Taiwan.
And have great fun here!

To be honest, I really want to go now, but that's because I like farms in general.

Week 19, this past week, was a lot better. I went through with my inverted symmetry. I was initially inspired by the cover of "North," by Stars, but I was also thinking of cities in outer space and the squarish scrollwork around some Chinese windows and building accents.


22 April 2013

thing-a-week 16: tunnel book

This is my first attempt at a tunnel book. It was my original plan for part of an anniversary gift, but I went with something else instead. :) I'm not going to share photos of that, though, so you get this tunnel book.


The top-view photo is actually older; you can see in the front-view photo that the flaps in the back have been cut off.

Tunnel books can be flattened for storage. Some of them have cover flaps — which I guess is why they're called "books", but I opted to leave this open. You can read more about tunnel books on Wikipedia.

The scene, for those of you who may not be familiar with the place, is inspired by the Kalsangi golf course and its view of Mt. Matutum.

12 April 2013

thing-a-week 15: Eush and Vikki's birthday cards

There sure have been a lot of birthdays around here.

These amateurish thaumatropes were my cards for former co-workers Eush and Vikki. I was supposed to see them Monday for a reunion/birthday dinner, but work kept me late at the office. Oh, well.


I will probably redo Vikki's, because thaumatropes are supposed to have the same background on both sides.

06 April 2013

things-a-week 13 and 14: Easter eggs and April's birthday card

I almost didn't get to work on something crafty last week, as I went home for the Easter break. But, on Saturday night, my mom asked Cris, my cousins, and me to prepare some eggs for the church egg hunt the next morning.


Mine are the island egg, the zigzags-and-dots egg, and the egg with the flower in the bottom left corner of this photo. Cris did the globe and some others (sorry, Cris; the globe's the one I remember best), and my cousins Paolo and Trixi did the rest.

As for this past week, it was April's birthday, so I made another birthday card.


01 March 2013

thing-a-week 9: kirigami "Rajasthani Palace" / Letter No. 15

I've said before, I have a thing for ruins, and if you get me started on ruins, I will eventually quote Geoff Dyer:

Ruins don’t encourage you to dwell on what they were like in their heyday, before they were ruins. The Colosseum in Rome or the amphitheater at Leptis Magna have never been anything but ruins. They’re eternal ruins. It’s the same here. This building could never have looked more magnificent than it does now, surrounded by its own silence. Ruins don’t make you think of the past, they direct you toward the future. The effect is almost prophetic. This is what the future will end up like. This is what the future has always ended up looking like. (Source)

If I wanted some text tattooed onto me, it would be taken from this passage, but I'm afraid it's quite long. It's also hard to distill into a phrase without sounding cheesy, and anyway, I've had too many strange skin problems to brave a possible ink allergy now.

The point is that I really, really, really like ruins and the idea of ruins: Jorge Luis Borges's city of the Immortals, the vision of the future in Alan Wiseman's "The World Without Us", the abandoned cities in "The Martian Chronicles" by Ray Bradbury, the ghost town that is Jinhua Architecture Park, the strange Sarangani hotel inhabited by three dobermans and a shih tzu, the fantastic buildings in the paintings of Arturo Luz, and so on.


You might argue that Luz's paintings aren't of ruins; the lines of the buildings are too clean. But look at them: the sky is blank, the landscape is bleak, and there's no sign of a human apart from the buildings themselves. They might as well be ruins — but that makes them more, not less wonderful.

Ruins are two things to me: a reminder that the only thing constant is entropy, and a challenge to make something that entropy will take at least a few centuries to wear down.

For this week's craft, I did a kirigami model of one of Luz's painting-buildings, "Rajasthani Palace." Ever since I saw his works on exhibit, I wanted to make models, and "Palace" felt like a good place to start.

Arturo Luz, Rajasthani Palace, 2008, 36 x 58 in., The Crucible Gallery


It's definitely less durable than stone columns, but I really enjoyed working on it. I liked the challenge of figuring out how much space the building and its sections might occupy. I liked imagining where each section began and what certain lines were for. The limitations of kirigami also meant that the building was more square than sprawling, and some parts couldn't join where they join in the painting. But that just added to the fun of the project.

If I had any frustrations, it's that the construction paper was too soft for the palace to stand for photographing; I had to hold it in my hand or set it on its side to take these pictures. And yes, I did use black paper, but my camera's weird exposure has made it kind of gray.

One more note about ruins: if you ask me where all my paper buildings are, I'll tell you that they've been crushed, thrown away, or simply slipped into a clearbook or envelope to be forgotten. Maybe it's weird, but there's something about them that makes them difficult for me to preserve: they don't come out the way they do in my head, the cuts or creases are imperfect, paper isn't very durable, I have photographs in case I ever want to do any building over again, and if even those are lost, then I'll have the fun of starting again.

It's not that I'm not attached to my buildings — I love them — it's that I know I can't really keep them forever.

22 February 2013

thing-a-week 8: flexagons + quick tutorial

I wanted to do something with the grocery bags that are piling up in my place, so I made some flexagons.

Wikipedia says that these are "models", though I don't know what they're models of. I just think of them as paper toys that change faces when you fold them a certain way.

Here's my flexagon with abstract, bacteria- and coral-inspired designs:

Face 1…

…folds back to show…

…face 2, which…

…folds back to show…

…face 3, which, …

…when folded back…

…brings face 1 back again.

I used pencil and markers for the lines and colored pencils for the fills.

Originally, I wanted to do a "town and country" theme, so I came up with the flexagon below. But, I didn't color it all the way, because I wasn't happy with the way the crayon looked on brown paper.

Skyscrapers for face 1…

…fold in to show…

…townhouses on face 2, which…

…folds in to show…

…a tiny farm planet on face 3 (which folds in to show face 1 again).


Now, flexagons are pretty easy to make. The ones in this post are actually called trihexaflexagons, because there are three faces. But, you can make flexagons that show even more faces; I've seen dodecaflexagons.

Flexagon.net is a pretty good place to start. You can either download a template from there and print it, or draw the templates manually like I did.

If you do make a template by hand, I suggest using a protractor to make sure that each triangle is equilateral. I also had to use the Pythagorean theorem to figure out the height of each triangle.

If you're impatient to give this a try but don't have a printer and don't want to use math (boo!) my triangles had these dimensions:

length of side = 3 cm
height = 2.6 cm

For a trihexaflexagon, draw the triangles in two lines like so: (PDF). Follow the folding instructions there as well. I wrote the guide letters really tiny in the corners and then erased them after the glue dried.

Once you're ready to design, decide whether your flexagon will fold in or fold back:

Folding in: Face 1 goes inside; face 2 appears outside.

Folding back: Face 1 goes outside; face 2 appears inside.

If you fold one face in and one back, at least one face will come up inverted (of course, that could be just what you want).

UPDATE (022613): After going home and checking the flexagons, I realized that what I really wanted to advise you against was designing one face, flipping it over, designing that, and then folding in/back and designing the third face. That's what gets you an inverted flexagon face. Fold in or back, it doesn't matter, as long as you fold before you design.

Design each face in the order you want. The design for each face is up to you, of course. Last year, I gave a flexagon instead of a birthday card. I also read about a teacher who taught his students to make flashcards out of flexagons, with each face featuring a different word and definition.

Let me know if this post is useful to you or if I could clear it up somehow.

So far, I've made only trihexaflexagons. I tried a tetrahexaflexagon once but couldn't figure out how to get the fourth face to appear. I guess that's something for another day.